
Nature manages to find ways for plants to propagate themselves by seed without any fancy equipment. Plants have evolved to reproduce in tune with, or in spite of, conditions prevalent in their original habitat. These conditions might include extremes of temperature, moisture levels, competition from more vigorous plants, seasonal variations, grazing patterns, all sorts. This has resulted in many different mechanisms for reproduction by seed; variation in seed form, distribution strategy and delaying tactics which plants employ to maximise the chances of passing its genes on to the next generation.
I should not have been surprised then, to find that treating all seeds the same way results in patchy germination. Last year this is exactly what I did. I sowed everything the same way, putting all the pots in the heated bench at 20°c. This worked well for about two thirds of the seed varieties I sowed. Those germinated away, some quickly, some slowly, but all perfectly satisfactory. But about a third of the varieties stubbornly refused to germinate. Rookie error. I do not intend to repeat that mistake this year so I’ve done a little research. The game is to convince the seeds that their evolved germination conditions have been met. I have attempted to allocate each seed variety I have to one of just a few categories of treatment:
- Heat – Bottom heat in the propagation bench, 20°c. This was my default approach last year.
- Cold – a period of cold to break dormancy, then back in the greenhouse. I’ll just put the pot in the cold-frame for a few weeks. If we have an unusually mild winter I might employ the fridge. Don’t tell Mrs P.
- Staging – a cool greenhouse bench is fine
- Outside – less complicated than ‘Cold’, the pot will stay in the cold frame till germination occurs
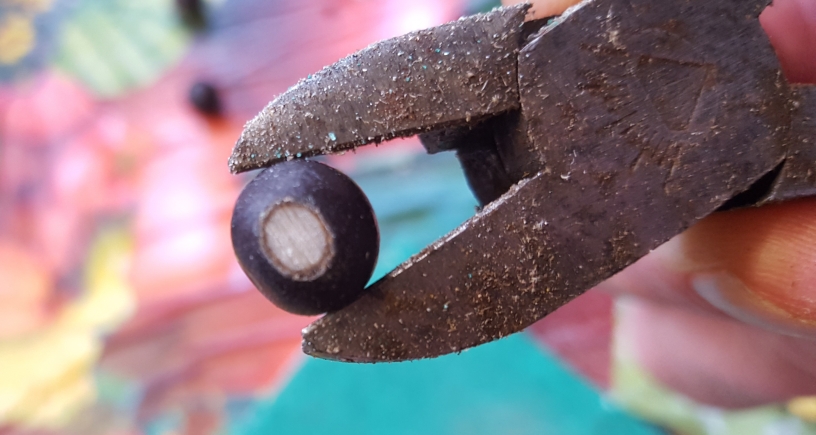
To add to the fun, some seeds have a hard coating that needs breaking down to expose the innards to moisture, triggering the germination process. In the wild this trick would be employed to delay germination, either until a more suitable time of year, or to allow for transportation. Canna is a good example, some of which I sowed the other day. I sanded the seeds down till the outer layer wore away. This is trickier than it sounds – a small, smooth, spherical object is quite hard to grip and apply to sand paper without sanding fingers, and/or losing the seed. After doing exactly that and, I’m afraid to say, effing and jeffing a few times, I ended up gripping the seed in some wire-cutters and rubbing on the sandpaper. Worked a treat. Some say they should also be soaked in water for 24 hours or more. I just sowed mine, trusting that the normal watering process is enough.


Anyhow, back to the majority. At least for the seeds I have, most of the funny business with seed treatments is with the perennials. For the most part the annuals are happy enough in the heated bench for an early sowing, or even direct where they are to grow. Here is how they break down (click to zoom in & read).


That is the beginnings of a sowing plan for my flower seeds this year. Next step is to put some timings on this lot. Addled plantaholic though I am, even I can see that this might be too many varieties to manage, especially as there is another batch of 20 packets of perennial seeds to come as a lucky-dip from the Hardy Plant Society seed scheme. I may have to (boo hoo) limit myself to a sub-set. As any of my teenagers might say, what-EVER!
I’ll be back soon with more propagation messing.

I love finding another gardening obsessive! Love your plant list. I look forward to reading more.
LikeLiked by 1 person
Several of the heated bench group have germinated (perennials only at this stage). I’ll post an update soon.
LikeLike
If you ever get bored with watching and waiting for empty pots to show signs of life you might try looking at the Deno method with seeds placed between paper towels or coffee filters, moistened and placed in a plastic baggie. This method makes it so easy to see if the seeds have molded, rotted, or are sprouting… you just need to take care with the tiny germinated seeds when planting.
You’ve really outdone yourself, I wish I was half as organized!
LikeLiked by 1 person
Funny enough one of my Twitter buddies was saying the same thing. Same method from the sound of it. I may give it a try but there is something magical about those firdt signs of green in the pot…
LikeLiked by 1 person
Very informative and well laid out. Thanks!
LikeLiked by 1 person
In the past I’ve soaked hard coated seeds first and then carefully nicked them with a sharp knife
LikeLiked by 1 person
Yes. I’ve also seen nail clippers used to good effect. I don’t keep those in the shed or I might have done just that!
LikeLike
You make that look so easy! Those seed are HARD! and they are hard to hang onto while sanding them.
LikeLiked by 1 person
Thoroughly recommend a light but firm grip with wire cutters, pliers would work well too. Doesn’t harm the tough seed coating and saved my fingers from being abraded. Eventually.
LikeLiked by 1 person