I have been busy adding planters to an otherwise boring passageway between our house and our neighbour’s house. It is in shade on one side, North facing, the other side gets some sun, properly described as partial shade I guess – it is south facing but shaded at times by next door’s house and the fence. I like the concept of a living wall and have occasionally thought about buying some of those hanging pockets. I recently saw a brilliant living wall arrangement on Jack Wallington’s blog, effectively a wooden shelving unit placed against his fence, in a similarly narrow, shady spot. He has planted his with ferns, all tolerant of dry-ish shade. His blog post majors on the plants and gives a comprehensive list of the ferns he has used.
After admiring this for a while I thought I would have a crack at building my own, using Jack’s plant list as a starting point. I’ve built mine and planted it up. Here is how I did it….
Tools needed:
- Battery powered drill (for drilling and screwing)
- Saw (I use a bench saw, but a normal saw would do)
- Wood screws
- Spirit level
- Tape measure
I used scrap wood from discarded pallets, but obviously the wood could be scavenged in other ways or even bought at a push. All joins are made by pre-drilling then screwing together. The pre-drilling prevents the wood splitting when the screws are tightened.
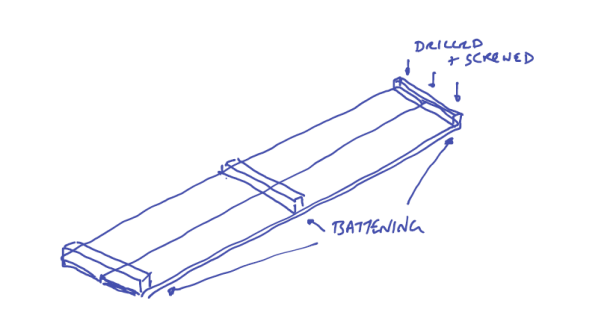
The size of the frame I built was governed by the lengths of wood I happened to have. I built each side using two planks, joined together by pieces of battening cut to size.

On the two long sides I added an extra piece of battening at each end. Aside from giving these sides more rigidity, this also provides somewhere to attach the two short sides. After this stage I had two long sides with three pieces of battening, one at each end and one in the middle, like the picture, plus two shorter sides, with battening just in the middle.
Next I attached the long sides to the short sides, making a box frame. This was done by screwing the ends of the short side to the battening on the ends of the long sides.

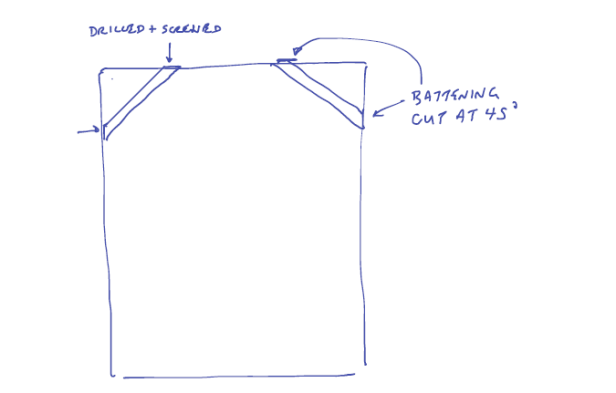
I found that this was a little unstable, the rectangular frame would easily become a parallelogram if given a light shove. To fix this I added some extra bracing to the inside of the rear of the frame. I cut two lengths of battening with 45° cuts on the end, then screwed them to the top and sides as shown below. This stops the ‘shearing’ I described before and made the box frame much more solid.

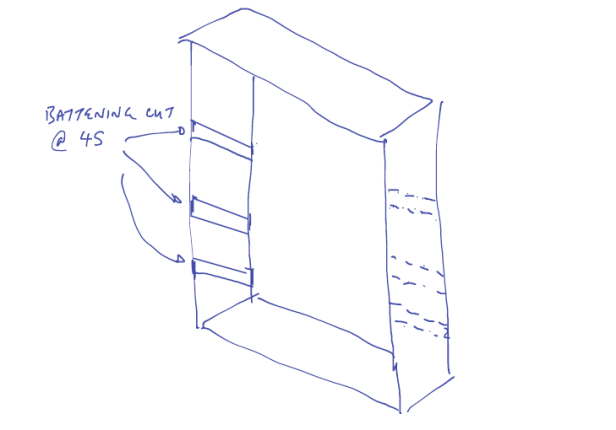
In Jack’s blog he described using 2L square pots for the ferns which then rested on sloping shelves. To make the shelves slope correctly, I needed to make the shelf supports at an angle. I cut some more battening to the right length, with 45° cuts on each end. I sort of guessed how far apart the shelves would need to be to accommodate a 2L pot on its side, measuring and marking accordingly on the sides of the frame. I screwed the battening to sides, checking they were level.

In the end I found some window boxes which were a good fit width wise but needed a bit more space, forcing me to move the battening about. Annoying but not difficult. Being bigger and holding more compost, the window boxes should retain water better than individual 2L pots.
The shelves were made by simply screwing two pallet planks to the sloping battening.

Although the pallet wood is treated, I decided to paint it with some wood preserver I happened to have. Two coats were needed, despite the alleged “one-coat” properties of the paint.
I could have just stood the frame against the wall but thought it would be more stable, and look better, if I attached it to the wall. I had some shelf brackets knocking about in the shed, those were attached to the wall then the frame suspended on those (imagine the top planks are the shelf). I then used two reasonably heavy duty 90° L-shaped joining plates that I bought from B&Q, £2.80 each. These were attached to the wall first, then to the frame, one on each side.

So that’s the construction finished, now to the fun part – the planting!
I ordered my ferns from shadyplants.net. Not being a fernatic, I used Jack’s planting list as a guide, then chose the ferns I liked the look of. I ordered the following ferns, one of each:
- Adiantum aleuticum ‘Imbricatum’
- Asplenium scol. ‘Angustifolia’
- Asplenium trichomanes
- Athyrium nip. ‘Pewter Lace’
- Athyrium nip. ‘Red Beauty’
- Athyrium nipponicum ‘Pictum’
- Blechnum penna-marina
- Dryopteris championii
- Dryopteris cycadina
- Dryopteris eryt. ‘Prolifica’
- Dryopteris erythrosora
- Polypodium ‘Whitley Giant’
- Polystichum luctuosum
- Polystichum neolobatum
Ferns mostly grow in woody areas in the wild, so I used what I hope is a suitable mix for the planting boxes:
- Well rotted leaf mould
- Bark chips
- Garden compost
- Multi-purpose compost
- 10mm gravel for drainage
I wasn’t too careful about proportions, I just chucked in a bit of each and mixed it up.
For the planting I had 4 or 5 plants per box. I can’t say there was too much thought put into the placing, but I was aiming for the larger ferns to be in the lowest planter box. I will let them grow on a bit, I can always move them around if needed.

I enjoyed making this, the plants were by far the most costly element, the construction probably cost me less than £20 including the window boxes. I’m really looking forward to seeing it develop. I’ll need to keep an eye on the watering in the first year, but once they are a bit more established they should need less looking after.
I’ll be back soon with more garden nonsense.


Nice job, looks great! Great instructions too.
LikeLiked by 1 person
Cheers!
LikeLike
Love this so much!! Found it just in time before I set my mind on how I want my herb garden. It needs to be convenient and space efficient – exactly what this is! Thanks for sharing 😊
LikeLiked by 1 person
Great! Good luck with it. Might be worth sticking to herbs that can tolerate a bit of drought, unless you are going to be well on top of the watering.
LikeLiked by 1 person
Thanks for the tip, gonna keep that in mind!
LikeLike
Oh goodness! I just mentioned vertical gardening in my recent article. It is so overrated and overused in the wrong situations. I should write another article about it. Although I have seen many exquisite examples, I have also seen some that were rather pointless, and a few that damaged the walls and decking they were attached to.
LikeLike
So positive as always Tony!
LikeLiked by 1 person
Oh gee, I was hoping you would not say that. It gets me in trouble.
LikeLiked by 1 person
Lovely to read how you made this and great drawings. I wish I were better with woodwork – a girls’ school handicap – but I reckon even I could make this. It deserves to thrive!
LikeLiked by 1 person
Well done ! My worry is also how to handle watering … ferns need wet soil as you know and maybe adding mosses between each fern will be good (the time needed for them to settle (?))
LikeLiked by 1 person
These ferns should all tolerate dry shade. They’ll need watering well in first year but less after that.
LikeLiked by 1 person
good to know.. keep us posted !
LikeLike
I’m no DIYer so I won’t be copying the shelf, but I thank you for the list of ferns as I want to establish some interest in my north-facing courtyard where I have a granite ledge beneath the house (the rest of the courtyard is for parking). It doesn’t receive any sunlight whatsoever, but is quite light in the summer months and not sheltered from rain. I have to use containers, but still struggling as to what kind of plants will grow there. Currently I have a very old hydrangea. Ferns would be perfect and I have loads of natives in the back garden which I am guessing I can divide (?) but some more interesting ones would be good. I’m thinking maybe fuchsias too for colour.
LikeLike
Hosta. Dicentra. Some roses and clematis are shade tolerant. Some geraniums too.
LikeLiked by 1 person
Ah, yes. I can use geraniums. Hosta no good as I have too many slugs and snails 😦 I do have one but it is in tatters by the end of summer. There is a rose climbing on the wall and a climbing hydrangea. Roses would look nice. I shall have a look. Thanks for the suggestions.
LikeLiked by 1 person
I really love this. I’ve just bought ferns for a patch of garden that I’m turning into a little woodland glade…might even be a gnome or two…
I might try this for our ‘entry’ between house and garage, although it’s totally shady and rain shadowed it might need too much upkeep….still, it would be interesting to try…
Did you see Sarah Venn’s planting wall pockets?
LikeLiked by 1 person
Yes I’ve seen those. My worry there is watering as the pockets are quite small I think.
LikeLike
The ferns i got are all dry shade tolerant (prefer it in fact).
LikeLike
It looks great! Will the ferns spend (and survive) the winter in the planters?
LikeLiked by 1 person
Yeah they’re all hardy ferns. Some evergreen some deciduous. Our winters don’t get that cold anyway (usually) plus this is a sheltered spot.
LikeLiked by 1 person
And yes, they’ll stay in position throughout.
LikeLiked by 1 person
What a great idea. In our area, with hot summers, it would require daily watering.
LikeLiked by 1 person
More by luck than judgement, this is right next to the hose and the irrigation system. I can hook it up if needed, but in think it’ll be ok in our climate.
LikeLike
I want one!!! The non-gardener is sighing with resignation😁
LikeLiked by 1 person
My apologies to the non-gardener…
LikeLike
The woodwork is so well put together and the living wall is going to look terrific when the plants grow.
LikeLike
Thanks! I hope so.
LikeLike